Welcome to my blog, hope you enjoy reading
RSS

Thursday, August 8, 2013

Amber Waves! The Beauty of Summer.

Oh the beauty of the Northwest! Our Country in general!  Where else in the World can you find such diversity, and differing climates.  I am, of course partial to the Northwest.  I lived in the Mid-West for a few years and couldn't wait to get home.  No offense to Mid-Westerners but, I missed the mountains and the lilacs.  I live outside of a beautiful city, where you can go downtown and stick your kayak in the water, with in five minutes you are hitting rapids.  You can "float the river" all the way through the city!  I grew up going to the lakes (yes plural...there are quite literally hundreds of lakes and creeks and ponds out here.) after school and cliff jumping, swimming, boating, tubing, water skiing....sometimes during school, but that is another story for another time.

This sunflower field is just up the road from us.  You just pull over and walk right up.  What an amazing photo opportunity.  My girlfriend has a professional camera and agreed to take pictures of the kids for me.  She's still editing, these I took with my iPhone.

I'm not a photo expert but I thought this turned out pretty freaking cool!

I love my girls, they thought this was just the neatest thing ever.  Usually this field is planted with wheat.  What a pleasant treat.

What a sweet boy.  He seems to just love life.  I could, and have, learn a lot of life lessons from him.

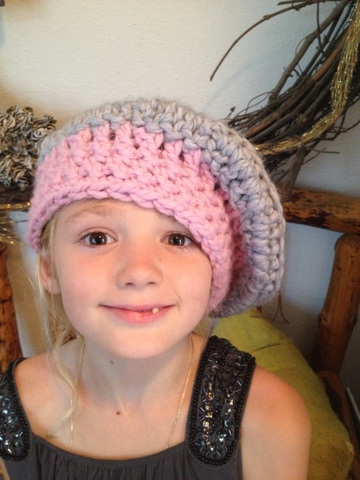
She see's life in such a sweet innocent way.  She has a sense of humor that keeps us laughing all the time. That is her gift.  We are really striving to show the kids what their gifts are.  As they get older it gets easier to identify them.  I believe one of hers will be a sense of humor.  She reminds me of my brother.  He has the best sense of humor I've ever met. 
 This is my little "bug."  (Short for "Cuddle Love Bug")  One of her biggest gifts is compassion.  If anyone is down, crying, hurt....she's right there to tend to their heart.  She laughs at just about everything and is one of the most expressive kids I have ever met.  She paints her stories with animated gestures and words!
To get this picture, I ducked down below the flowers and held him up...my arms where shaking by the time we were down....but it was worth it...look at that picture.  The ones my girl friend took are even better....
Bug is twirling through the flowers!


 Another crop in our area....Wheat! This particular field was so white and with the green trees and blue skies behind it, it's breath taking!  Those "Amber Waves of Grain" we sing about!


My oldest son, our miracle.  Getting him to take a picture was difficult, he was more interested in this grasshopper! He is also very compassionate.  He has many qualities, and we are still trying to nail down what his gifts are.  He is only two after all.  We have started sharing with him his story.  How Jesus spared him, let him stay here with us.  When he had his episode (a Coarctation of the Aorta that was not caught when he was born until he was coding in the hospital) he had a 5% chance of survival.  The doctors told us he would die, and we watched them perform CPR 12 full minutes. After surgery he was in a coma, and all his organs had shut down.  He made a full recovery.  I tell, you what, that'll change your perspective on life.  He has scars from his heart surgery and from all the needles and tubes they had to shove in him to try to save him. This son of mine loves life! Everything is an adventure to him! It is exhausting trying to keep up with him.
My oldest.  She scares me, only because we are so much alike.  She is a natural leader, and has a servants heart.  That is one of her gifts.  She loves to serve others, and puts them before herself.  Selflessness, how many of us could stand to use a little of that.  I know I could.  She's very sensitive, a very tender heart. She loves animals, and wouldn't ya know it, they love her!
A picture of a picture, my girlfriend was editing pics on her computer...I can't wait to get them!

Saturday, August 3, 2013

The Battle of the Coffee Creamer!

A boy and his Creamer..
Do any of you have a two year old....not just any two year old...a wild two year old boy.  A two year old boy who tests, pushes, and explodes every boundary?  Whose stubbornness rivals that of a mule? I do.  He's adventurous, fearless, and just down right crazy sometimes.  I love my son, there is no question about that! I love him passionately, maybe its that passion he has inherited from me.  I look at my husband, so laid back and easy going, and I think....how in the world did ALL our kids get my energy? Ack! Lately, A2 has taken to sneaking into the fridge.  His item of choice? Coffee Creamer.
Every morning, before I go out to milk the goat, I make a pot of coffee.  There's something magical about coming in, from the cold or wet and sitting down with a mug of coffee.  What's not so magical....opening the fridge to retrieve my creamer and its not there!  It has disappeared! One time I didn't find it for two days!  A2, with the stealth of a thousand ninjas, opens the fridge, climbs to the top, snags the creamer and makes off with his bounty.  He hides in his closet and takes nips off it through out the day...it's like an addiction...he goes and gets his fix and he's set for a few hours.  I open the fridge, see it missing and immediately go to him...."A2, where is my creamer!?"  He gets this look on his face.... remorse you say? Nope, a mischievous all knowing look, borderline....like what do I get out of this exchange....."Your LIFE!" I think. He usually brings it out to me, big tearful eyes, lip hanging to the floor.
And, heaven forbid I leave my coffee sitting out...That's like a blaring beacon of awesomeness! He will run off with my coffee....with giggles of joy. 
I love this boy of mine....Solution....I put some vinegar in an empty bottle....now we wait.  One nip off that problem solved.


Friday, August 2, 2013

Quick and Easy French Beret Hat Pattern

Every summer my dear friends put on a "camp" for our girls.  We have an over abundance of young ladies in our circle!  This years camp is "Camp Francias" (say that with a French accent). There where 25 young ladies there! Every year my two friends out do themselves, they really put a lot of thought and effort into it!  It has become a annual tradition, with a new theme each summer.  To say thank you, I wanted to make something quick and simple, that would compliment the theme. Que: French Berets! They scream FRANCE! So I just sat down and started to free hand it.  When I say that this pattern is easy...it's an understatement.  I'm serious.

You will need:
A chunky yarn
N-Hook (9MM)

You will need to know how to:
Single Crochet: sc
Double Crochet: dc
Double Crochet Decrease: dc2tog
Slip Stitch: ss
Chain: ch
Crochet front loop
Crochet back loop

And you need to know how to do the magic ring!

Row 1: To Start make a magic ring, ch 2 (first dc), 11 dc, ss to 2nd ch of ch2, ch 2, turn
Row 2: dc into same stitch as ch2 (your first increase), 2 dc into each stitch (24 dc), ss into 2nd ch of ch 2, ch 2, turn
Row 3:  dc into same stitch as ch2, *dc, 2 dc, repeat * to end, ss to 2nd ch of ch2, ch 2, turn (36 dc)
Row 4:  dc into same stitch as ch2, *dc, dc, 2 dc, repeat* to end, ss into 2nd ch of ch 2, ch 2, turn
Row 5:  dc into same stitch as ch2, *dc, dc, dc, 2 dc, repeat* to end, ss into 2nd ch of ch 2, ch 1, turn

Now if you want to make a lovely trivet, this would be a good stopping point! If you want to finish your beret read on...

Single crochet into the back loop.
Row 6:  This is where it could get tricky!  sc into the back loop of the same stitch as ch1, sc in back loop all the way around. ss into first sc, ch 2, turn
Row 7:  dc into same stitch as ch2, *dc, dc, dc, dc2tog, repeat* to end, ss to first dc, ch 2 turn
Row 8: dc into same stitch as ch2, *dc, dc, dc2tog, repeat* to end, ss to first dc, ch1, turn

Now if you wanted to change colors for the band, this would be a good spot! You will crochet in the back-loop for row 9, it will make the band more prominent.

Row 9: sc into front loop of same stitch as ch1, sc front loop all the way around, ch1, turn
Row 10-12: sc same stitch as chain one, sc all around (no longer back loop)
Single Crochet into the front loop.
After you have finished decreasing...looks like a deflated doughnut.
Fasten off and weave in ends.  Add some embellishment if you wish, I wove ribbon into one, maybe add a pom to the top.  Make it as Frenchy-French as you like!


Saturday, July 20, 2013

Crochet Bodice Dress

This is a super easy pattern, and if you have basic sewing knowledge you can do it! My goal with this pattern is to really explain the how's...not just throw a pattern out there at you.  The beauty of this dress is there are so many ways you can do it.  You can keep it simple or go crazy.  This comes from my own trial and error.
The first dress I made, my eight year old was my guinea pig!

What you need: (This pattern is for a children's size 7)'
  • About a yard of fabric (I used a cotton)
  • Worsted weight yarn in the colors you want, sometimes I edge the bodice in a different color (This yarn is from Hobby Lobby)
  • Size H hook
  • Sewing machine with what ever thread color you need
  • Pins
 The Bodice:
Chain 72
YO HDC second Ch from hook, HDC across, Ch2 turn
Repeat for a total of 16 rows (I told you this was easy!)

finished seam
Now you need to sew the bodice together to make a tube, I like to fold it in half and crochet down the edges rather than whip stitch it together.  I find it holds better and doesn't stretch.
Once you have it together its time to do the straps.

Straps:
Count 4 stitches away from the seam in both directions (8 stitches in between straps) Ss, ch2, hdc 6 stitches, ch 2. repeat for a total of 16 hdc rows.  Do not finish off if you are going to crochet the seam (see below)
Dress with ruffles and small flowers added to bodice.
No, I have no magic trick for sewing the strap to the front, You can sew it together but, again, I crochet it on.  Turn the bodice inside out, lay the two edges together and crochet across.  Again, a stronger seam than a whip stitch.  To line up where to sew it on the front, simply make sure the back seam is centered, and line up the straps evenly with the front, make sure there are 8 stitches between the two.
Now all you need to do is finish the edges (sc), You'll have to do it in three places; the outsides and armpits of the dress, and the neck and inside of the straps.  This is where you could add another color or even ruffles. Make sure you 2sc in the corners
To do ruffles:
On the outside of the strap, starting at the base: sc, 5dc, sc* repeat until you reach the other side (you're just doing a shell) 

Now its time to prepare the skirt:
I am going on from here assuming you know how to sew :)
Sew an 1 inch hem
On the opposite edge, fold and iron a 1/4 in then fold over again a 1/2 in and sew. (this is the edge that goes along the bodice)
Fold in half and sew together with a 1/2 in seam.
Iron seam edges flat

Sewing the bodice to the skirt:
Now here's where it can get tricky.  There's no real easy way to explain this so I'll do my best.

Turn the bodice and the skirt inside out.
Line up the bodice and skirt seam and pin. Now you are going to make two pleats in the front and two in the back, or if you're an over achiever you can make a bunch of little pleats all the way around...basically you're making the skirt fit the bodice... to make the pleats you fold the fabric over on itself and pin it. Line the edge of the fabric up with the top of first HDC row (so you'll have a full row under the edge)
This dress I pleated all the way around instead of two large pleats.
Once you have pinned all the way around, (I recommend pinning A LOT! You don't want that baby to move.) set your sewing machine to a zig zag stitch and sew the skirt and bodice together. Go slow, My machine did well, the crochet seem is pretty thick so I am extremely cautious here.

Whew! the hardest part is over...now to accessorize!
For this pink and white dress I crocheted ties onto it...easy enough..

Chain 70, ss along whole front just above the zig zig stitch, chain 70, ch2 turn now HDC all the way across.  Make it as thick as you want! On you last row, line up the rows of the band with the dress and crochet to the dress at the same time...or you can leave it loose...or sew it on.

The flower is a three tier flower, I found the pattern for this one here


Pocket:  Okay the pocket was my first ever and I free handed it...


If I missed something or  you have a question please feel free to ask!


This dress is an example of a simple belt and ruffle sleeve. (Ignore my horrible messy house in the background)


Another variation on the belt.  This particular dress I made the bodice shorter, more of an A-line dress. I used a wide ribbon for the tie and its crocheted in a herringbone half-double.

Monday, June 24, 2013

Lady Bug Study Part 1

K's jar, every other day she adds a leaf with aphids.
This Larva is munching away on an aphid. They are veracious eaters!
If you want to raise ladybugs as a unit study or just for fun you don't have to buy a kit!  This happened by accident, K brought in some lady bugs and put them in a mason jar. I was telling her to take them back outside when K said;" Mom! She's laying eggs!" Sure enough there was a neat bunch of lady bug eggs! The female was the giant one.  So we let the momma ladybug go and I began researching all the things ladybug. They're pretty easy to raise. We have an aphid infestation right now so we have a steady food supply. So we grabbed some aphid covered leaves and threw it in the jar. Three days later they began hatching! They remain in the larval stage for 5-7 days, during which the have a veracious appetite! They are machines! We spent a lot of time watching them hunt down aphid after aphid.  I must say, they are ugly in the larval stage...not what you would think a pretty ladybug would look like.  A true ugly duckling story.  We're still waiting for them to go to the pupa stage, it's been 6 days since they hatched so I will post a part 2!  In the mean time here are the resources that I have used:

There are so many things out there you can do! Make ladybug crafts, reading, etc!


Homeschool Room Evolution

When we bought our house I was very excited about the family room off the kitchen.  Our house is basically split at this point, one side is the kids rooms, bathroom, and laundry room.  The other half is the dinning room, living room and the master room/ bathroom.  I love that this room is the central location of the house.  When we first started homeschooling we had a couch in here and the toys.  We would do school work at the counter or in the dinning room.  Those of you that homeschool know, there is always a mess.  Always! Be it books, projects left to finish the next day, etc.  I was tired of trying to hide evidence of that days schooling; for guests, my husband, whatever.  This is our lifestyle right, no need to be ashamed of it.
I started searching the internet for homeschool room ideas.  Some of them where pretty elaborate.  I loved the look, but elaborate none the less.....and pricey.  I wanted my room to be functional, not just for school but the younger kids as well.  And what about when we had guests over?
So I ditched the couch (donated it) and started searching Craigslist. I made a list of the items I felt I would need:
  • Table/ Chairs
  •  Bookscase
  • Chalk Board
   I found the table on Craigslist for $40.  The woman I bought it from started to sand the top and had already painted the bottom.  Most of the work was already done.  I love a good DIY so I broke out the sander and finished the top.  I had plenty of stain left from when I did my dinning table.  So it matched perfectly.  When I saw the color she had painted the bottom I knew it was meant to be....it matched my decor.  It's a drop side too, so if I need the whole room (like during a party) I can push it up under the chalkboard, nice and flush with the wall.
  I looked into making my own chalk board, which is pretty easy, but honestly even that, to me, was to much money.  (I'm trying to be frugal).  That was a lucky find.  My friend called me from a yard sale: "Hey Crystal, aren't you looking for a chalkboard, there's one here for $3.  Want me to snag it for you?" Heck YEAH! I picked it up from her....lets just say it was rough.  The varnish on the trim was pealing and it stunk...like cat pee. I sanded that bad boy...doused it in vinegar to kill the smell, and stained it to match the table...voila! The one mistake I made, I taped the board with painters tape to keep the stain and  clear coat off the board....When I peeled it up, it took the chalk board finish up with it.  Thankfully my house has a lot of "shabby chic" (code for beat to hell) furniture so it turned out okay.
The Bookcases I got for a killer deal at Target.  They where on sale. I asked a clerk to grab one from the back and took the one that was on the floor.  When I got up to the front to pay, it wasn't there.  The clerk had gotten busy and forgot.  He was very sweet and apologetic, I told him no biggy, as my kids where pulling at me. He said; "You know what, since you're being so sweet about it, we'll take an extra 10% off."  It pays to be nice folks!  On the bottom shelves are coloring books, and reading books for the little kiddos.
I am so glad we did this. I have a functioning room now, the little kids can play while the big kids school.  I can see the back yard from the room too, so I can basically watch all the kids in different areas from one spot!  When we have guests over we have an extra table if we need it.
 The pictures are deceiving....I cleaned up before up took them. Normally you will see books scattered across the table, toys littering the floor (accompanied by the children playing with them).  the chalkboard, when not being used in a lesson has become the family message board, and of course a canvas for the kids.

So...you can throw together a great school room, that functions for cheap! I spent about $83 for the table, chairs, bookcases, and chalkboard. One note for the table....It's not big enough.  I have one kid who  loves to spreeeaaaaaad out while she works.  So I will be watching for a bigger one. I am also on the lookout for more bookcases, smaller to fit under the chalk board, and my husband will be building bench seats under the windows....Still evolving.

Tuesday, May 14, 2013

Lessons on Character.....from Spiffy the Goat.

Meet Spiffy and Spy, the latest additions to our mini farm.  I had grand ideas about bring home a milk
goat, provided by my dear friends, and her jumping straight into the stanchion , eager to be milked! HA! Goats may be simple minded but that does not mean they are dumb!  We built our pen, we built our stanchion, all was ready and beautiful.... I went to my friends house the morning of the pickup, milked multiple goats, including Spiffy, to sharpen my skills before the grand moment when I would milk her on my own at home.  It went well.  I loaded her into the crate in the back of my Yukon, K held Spy in her lap in the back seat.  I brought them home, put them straight in their pen with super yummy alfalfa and grain to help them adjust.  I put down a ton of straw bedding...my first mistake...you don't need a lot...and they will pee on it...immediately...oh no not in their goat yard....in their bedding.  Okay, moving on.  My girlfriend told me to pick up just plain ol' grain.  I heard regular cob...not sweet cob.  Oops....lets just say Spiffy was less than impressed.  So the next morning it was the big moment...my first milking, solo.  I was up and ready...supplies ready the night before...teat dip, check....cleaning solution...check....milking pail...check.  That was about as smooth as it would get...I opened the pen door and she just stared at me...like "what do you want me to do  lady.." So I wound up dragging her to the stanchion....she stared at it...so I picked her up and set her on it...to which she promptly jumped off.  Okay, round two...this time I picked her up and forced her head into the lock. At this point her patience and mine were gone.  I filled the bucket with the not so impressive cob, to which she immediately knocked of the stanchion....an accident I thought, so I picked it up and put it back....down again....hmmmm so I tied it to the stanchion....to no avail she still knocked it down.  Oy...note to self by over the rail bucket. Okay, finally time to milk....or so I thought, lets just say I had to hold her up with one hand and attempt to milk with the other...remember I am a novice here.  I couldn't even get  the bucket under her...i basically manhandled her and milked straight unto the stanchion.  It was one of the most frustrating experiences in a long time!  To top it off she had diarrhea! I called AW near tears.  I didn't understand...at her house she jumped right in, let her milk happily...what was I doing wrong!?!?  So here is where I learned lessons on character from, of all things, a goat.  I tend to force things, make them happen....not always a good quality.  This goat was just removed from her heard, brought to a new home, and then expected to perform with no training (or re-training) what so ever.  I remember when AW had moved her stanchion and all her goats were confused, they are a creature of habit and routine.
So day two comes around, sure enough, she is not happy.  Since last time she was forced onto the stanchion she was ready for a fight.  I came out and talked to her gently...(I also picked up the right grain so that helped). She would not budge and she had to be milked...my frustration grew, and grew, and I wound up picking her up again and the fight was on...she stomped she kicked....she shuffled..She even sat down..she threw the grain bucket on the floor.  Oy...Okay back to the store for the right bucket....and another couple days of this and I was done! I was ready to do what all the other blogs say to do with a "bad goat." Hobble her, strap her to the stanchion etc....But I remembered what my dear friend said.  "Make it a good experience for her...she'll WANT to be up there."
The next milking I took Spy with me, slowly wrestled her into the stanchion, now up to this point she was refusing even grain! If you know goats, they love their grain.  I put Spy up on the stanchion and let him nurse for a second...I could instantly see her relax.  I quietly removed him and put him in the pen next to us.  I quickly sat behind her and tried to milk...oh no!  She began her dance.  I backed off and pet her and talked to her.  Picture a grown women, all by her self, talking to a goat.  "I WILL milk you Spiffy...it has to be done."  I began again, she sat one me....but i would not stop.  There was no bucket I just milked straight onto the stanchion.  She had learned that if she danced around enough I would give up.  It had always been a battle of the wills and I may be stubborn but not as stubborn as a goat!  I just kept on milking away! A comical sight I'm sure, a goat sitting on my arms as I milk away. The next day, I did the same routine, put Spy on the stanchion and let him take a quick sip.  But this time...oh sweet joy this time she let me milk, as long as I was talking to her.  It seemed to calm her...and to be honest made me less timid...I mean come on, how can you focus on being timid when you feel crazy enough to have a conversation with a goat!  So I talked away, prattled on and on.  Oh to be a fly on the wall right.  The next day, I went out, put Spy straight into the pen and started talking to Spiffy, by this point I wasn't having to lift her into the stanchion.  She was still a bit timid, and a bit prancy towards the end...it was taking me a good 15 minute to milk her out.  She even pooped in my milk a few times..I just kept on milking as if she hadn't done anything. (We didn't drink that milk)  She knocked the bucket a few times with impatience.  But, now with practice I finish milking before she even finishes her grain.  It became a race for me!  And now, when I open the pen...I can't keep her OFF the stanchion.  She gives a a quart and a half of sweet yummy goodness every morning.  This June we'll get a half gallon and a quart daily when Spy weans.  And yes, I still talk to her while I'm milking...or just pray a loud. The kids ask to come out with me, and yes its good for them to learn, but sometimes  I say no, so I can have a moment to voice my thoughts with out eager little ears around.
Moral of the Story: Force is not always the answer, Patience, Kindness, Gentleness and Peace, are Fruits of the Spirit for a reason!  Spiffy showed me where I was lacking in these areas.  Not just with a goat, but in life...with my kids, my husband, and those around me.  Lesson well learned, thanks Spiffy.