Welcome to my blog, hope you enjoy reading
RSS

Thursday, August 15, 2013

My Overly Ambitious First Garden

I have always wanted a garden.  To grow our own produce and get my hands dirty.  So, following  one of my main mottos: Go big or go home, we did it! We fenced off a 50X100 area in ten foot fencing. That was quite a sight I imagine!  Hubby drove the truck and I stood in the bed (we would rotate) and I would heft a massive post pounder (about 60 lbs) over my head and pound the posts in.  A funny side story: that thing is from my childhood.  We used it around my parents property to maintain 27 acres of fence line.  We had to keep the horses and llama's in and the neighbors cows out.  That's right, I said llamas.  Their names were Jose' and Cuervo...get it...we didn't name them.  They were given to us by our cousin.
 Hubby built me a beautiful gate between the two trees at the top of the garden. I read and read and read and read...you get the point.  I talked to my Nana, my garden guru, and read some more.   My husband built me a nice gate and we went to town.  I already know a few changes for next year.  The dry spots and wet spots.  The highs and lows of the garden.  It has been a family project for sure.  The kids had a major role in planting.  Hubby really enjoyed tilling on his tractor.  I dug the rows, then poked the holes.  The kids came along behind me and dropped in the seeds, then filled the holes.  Now we are seeing the harvest! Corn, carrots, zucchini, squash galore! To much to list.  We've already harvest 30 lbs of potatoes, and daily the kids and I are pulling green beans out.  We bring them in, blanch them and freeze them. I'll post soon about the harvest.

The beginning!
I left the very middle un-planted and the kids drive their trucks in the mud and dirt.

Huckleberry

kids planting
Grafted Apple Tree
At the north side of the garden I am making it a grand little area. Not sure what to call it but I planted an apple tree in the middle and put my vintage 1940's tree bench around it.  That tree is a true work of art. It has four varieties of apples grafted to it: Honey Crisp (my FAV-OR-ITE!), Gala, Granny Smith, and Fuji.  I have a ...are you ready for this...huckleberry bush, yes I said it! There is a nursery here that has developed a huckleberry for lower elevations.  I was skeptical but intrigued so I bought one.  Now I am kicking myself, I want to plant a whole hedge along the north fence.  I am sinking flat boulders into the ground at the top of the garden.  It will be amazing when its done.  The boulders will surround the hedge of huckleberry and a hedge of blueberries.

This is the sugar pumpkin before it went crazy! Now it covers a good ten ft area!


Carrots and green onions.


Our First corn harvest! Oh my sweet glorious taste buds!


Poles Beans, Spaghetti squash and zuchinni in the back ground.


K looks terrified...we have a lot of bees! These acorn squash plants are huge!


Sugar pumpkin! They are getting huge!

DIY: Rescuing a Classic


I picked up this little gem a few years ago, at a thrift store for $15.  It's a old folding top Sears Roebuck sewing machine table ....It's three different colors.  I hadn't done anything with it because I didn't have time and frankly, I wasn't sure how I wanted to do it.  Ace Hardware does a promo; a quart of paint...FREE!  They must hope that you either get a color and get hooked on it, therefore buying more, or that you buy painting supplies while you're there...or they're just awesome.  I'll go with they're just awesome.... A DIY'ers dream right! So I went in and picked out a color called "Pickup Truck Blue."  I had intended on painting my front door this color, but Hubby vetoed that (it wound up being "Sun Dried Tomato")  So I had a quart of paint...light bulb! This poor table.  I took it out side and started sanding it...Oh my word....a million layers of paint later, okay four layers of paint later I got the top sanded.
Next to paint the bottom. I scuffed the existing paint so my paint would hold well...I didn't do the inside yet because I haven't decided this tables fate yet.  I saw a beautiful one, just like mine, that had been converted into a beverage cart. Any who...I painted a total of three coats.
Now the top.  I still have some of my stain from the kitchen and school table.  What a great way to tie them all together.  I left a bit of turquoise paint on the edges (one of the million layers).  I thought it would look awesome with the stain.
After two coats of stain, I sealed it and....TADA!  This table cost me a grand total of......15 DOLLARS!  Yep, between the free paint, left over stain, and I reuse my brushes...These things sell re-purposed for between $75-$200 (That beverage cart I saw was the exact same model and it was $175).  I barely skimmed the top of the paint, so I have almost a whole quart left. I am just a bit proud of myself.
I thought about distressing it, but I promised Hubby clean lines.  He isn't a big fan of the shabby chic look.  So now I have a beautiful functional side table.  Maybe someday I'll get ambitious and finished the inside, maybe do one of those fancy beverage carts like this one.  Or, even better, find an old sewing machine and return this beauty to her true mission!

I do a light first coat.


Love it! The milk glass lamp was my grandmothers, the base anyway.  I had to hunt down a lamp shade, found it at an estate sale.

Look at that gorgeous wood grain! Why would anyone want to hide that under a million coats of paint?!?


Thursday, August 8, 2013

Amber Waves! The Beauty of Summer.

Oh the beauty of the Northwest! Our Country in general!  Where else in the World can you find such diversity, and differing climates.  I am, of course partial to the Northwest.  I lived in the Mid-West for a few years and couldn't wait to get home.  No offense to Mid-Westerners but, I missed the mountains and the lilacs.  I live outside of a beautiful city, where you can go downtown and stick your kayak in the water, with in five minutes you are hitting rapids.  You can "float the river" all the way through the city!  I grew up going to the lakes (yes plural...there are quite literally hundreds of lakes and creeks and ponds out here.) after school and cliff jumping, swimming, boating, tubing, water skiing....sometimes during school, but that is another story for another time.

This sunflower field is just up the road from us.  You just pull over and walk right up.  What an amazing photo opportunity.  My girlfriend has a professional camera and agreed to take pictures of the kids for me.  She's still editing, these I took with my iPhone.

I'm not a photo expert but I thought this turned out pretty freaking cool!

I love my girls, they thought this was just the neatest thing ever.  Usually this field is planted with wheat.  What a pleasant treat.

What a sweet boy.  He seems to just love life.  I could, and have, learn a lot of life lessons from him.

She see's life in such a sweet innocent way.  She has a sense of humor that keeps us laughing all the time. That is her gift.  We are really striving to show the kids what their gifts are.  As they get older it gets easier to identify them.  I believe one of hers will be a sense of humor.  She reminds me of my brother.  He has the best sense of humor I've ever met. 
 This is my little "bug."  (Short for "Cuddle Love Bug")  One of her biggest gifts is compassion.  If anyone is down, crying, hurt....she's right there to tend to their heart.  She laughs at just about everything and is one of the most expressive kids I have ever met.  She paints her stories with animated gestures and words!
To get this picture, I ducked down below the flowers and held him up...my arms where shaking by the time we were down....but it was worth it...look at that picture.  The ones my girl friend took are even better....
Bug is twirling through the flowers!


 Another crop in our area....Wheat! This particular field was so white and with the green trees and blue skies behind it, it's breath taking!  Those "Amber Waves of Grain" we sing about!


My oldest son, our miracle.  Getting him to take a picture was difficult, he was more interested in this grasshopper! He is also very compassionate.  He has many qualities, and we are still trying to nail down what his gifts are.  He is only two after all.  We have started sharing with him his story.  How Jesus spared him, let him stay here with us.  When he had his episode (a Coarctation of the Aorta that was not caught when he was born until he was coding in the hospital) he had a 5% chance of survival.  The doctors told us he would die, and we watched them perform CPR 12 full minutes. After surgery he was in a coma, and all his organs had shut down.  He made a full recovery.  I tell, you what, that'll change your perspective on life.  He has scars from his heart surgery and from all the needles and tubes they had to shove in him to try to save him. This son of mine loves life! Everything is an adventure to him! It is exhausting trying to keep up with him.
My oldest.  She scares me, only because we are so much alike.  She is a natural leader, and has a servants heart.  That is one of her gifts.  She loves to serve others, and puts them before herself.  Selflessness, how many of us could stand to use a little of that.  I know I could.  She's very sensitive, a very tender heart. She loves animals, and wouldn't ya know it, they love her!
A picture of a picture, my girlfriend was editing pics on her computer...I can't wait to get them!

Saturday, August 3, 2013

The Battle of the Coffee Creamer!

A boy and his Creamer..
Do any of you have a two year old....not just any two year old...a wild two year old boy.  A two year old boy who tests, pushes, and explodes every boundary?  Whose stubbornness rivals that of a mule? I do.  He's adventurous, fearless, and just down right crazy sometimes.  I love my son, there is no question about that! I love him passionately, maybe its that passion he has inherited from me.  I look at my husband, so laid back and easy going, and I think....how in the world did ALL our kids get my energy? Ack! Lately, A2 has taken to sneaking into the fridge.  His item of choice? Coffee Creamer.
Every morning, before I go out to milk the goat, I make a pot of coffee.  There's something magical about coming in, from the cold or wet and sitting down with a mug of coffee.  What's not so magical....opening the fridge to retrieve my creamer and its not there!  It has disappeared! One time I didn't find it for two days!  A2, with the stealth of a thousand ninjas, opens the fridge, climbs to the top, snags the creamer and makes off with his bounty.  He hides in his closet and takes nips off it through out the day...it's like an addiction...he goes and gets his fix and he's set for a few hours.  I open the fridge, see it missing and immediately go to him...."A2, where is my creamer!?"  He gets this look on his face.... remorse you say? Nope, a mischievous all knowing look, borderline....like what do I get out of this exchange....."Your LIFE!" I think. He usually brings it out to me, big tearful eyes, lip hanging to the floor.
And, heaven forbid I leave my coffee sitting out...That's like a blaring beacon of awesomeness! He will run off with my coffee....with giggles of joy. 
I love this boy of mine....Solution....I put some vinegar in an empty bottle....now we wait.  One nip off that problem solved.


Friday, August 2, 2013

Quick and Easy French Beret Hat Pattern

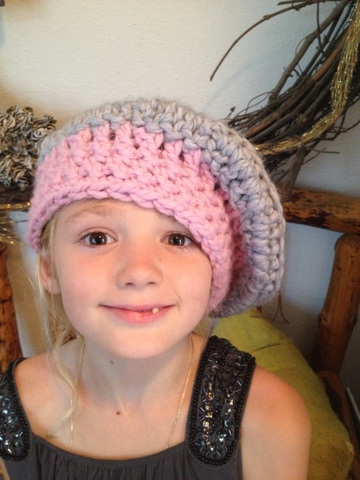
Every summer my dear friends put on a "camp" for our girls.  We have an over abundance of young ladies in our circle!  This years camp is "Camp Francias" (say that with a French accent). There where 25 young ladies there! Every year my two friends out do themselves, they really put a lot of thought and effort into it!  It has become a annual tradition, with a new theme each summer.  To say thank you, I wanted to make something quick and simple, that would compliment the theme. Que: French Berets! They scream FRANCE! So I just sat down and started to free hand it.  When I say that this pattern is easy...it's an understatement.  I'm serious.

You will need:
A chunky yarn
N-Hook (9MM)

You will need to know how to:
Single Crochet: sc
Double Crochet: dc
Double Crochet Decrease: dc2tog
Slip Stitch: ss
Chain: ch
Crochet front loop
Crochet back loop

And you need to know how to do the magic ring!

Row 1: To Start make a magic ring, ch 2 (first dc), 11 dc, ss to 2nd ch of ch2, ch 2, turn
Row 2: dc into same stitch as ch2 (your first increase), 2 dc into each stitch (24 dc), ss into 2nd ch of ch 2, ch 2, turn
Row 3:  dc into same stitch as ch2, *dc, 2 dc, repeat * to end, ss to 2nd ch of ch2, ch 2, turn (36 dc)
Row 4:  dc into same stitch as ch2, *dc, dc, 2 dc, repeat* to end, ss into 2nd ch of ch 2, ch 2, turn
Row 5:  dc into same stitch as ch2, *dc, dc, dc, 2 dc, repeat* to end, ss into 2nd ch of ch 2, ch 1, turn

Now if you want to make a lovely trivet, this would be a good stopping point! If you want to finish your beret read on...

Single crochet into the back loop.
Row 6:  This is where it could get tricky!  sc into the back loop of the same stitch as ch1, sc in back loop all the way around. ss into first sc, ch 2, turn
Row 7:  dc into same stitch as ch2, *dc, dc, dc, dc2tog, repeat* to end, ss to first dc, ch 2 turn
Row 8: dc into same stitch as ch2, *dc, dc, dc2tog, repeat* to end, ss to first dc, ch1, turn

Now if you wanted to change colors for the band, this would be a good spot! You will crochet in the back-loop for row 9, it will make the band more prominent.

Row 9: sc into front loop of same stitch as ch1, sc front loop all the way around, ch1, turn
Row 10-12: sc same stitch as chain one, sc all around (no longer back loop)
Single Crochet into the front loop.
After you have finished decreasing...looks like a deflated doughnut.
Fasten off and weave in ends.  Add some embellishment if you wish, I wove ribbon into one, maybe add a pom to the top.  Make it as Frenchy-French as you like!


Saturday, July 20, 2013

Crochet Bodice Dress

This is a super easy pattern, and if you have basic sewing knowledge you can do it! My goal with this pattern is to really explain the how's...not just throw a pattern out there at you.  The beauty of this dress is there are so many ways you can do it.  You can keep it simple or go crazy.  This comes from my own trial and error.
The first dress I made, my eight year old was my guinea pig!

What you need: (This pattern is for a children's size 7)'
  • About a yard of fabric (I used a cotton)
  • Worsted weight yarn in the colors you want, sometimes I edge the bodice in a different color (This yarn is from Hobby Lobby)
  • Size H hook
  • Sewing machine with what ever thread color you need
  • Pins
 The Bodice:
Chain 72
YO HDC second Ch from hook, HDC across, Ch2 turn
Repeat for a total of 16 rows (I told you this was easy!)

finished seam
Now you need to sew the bodice together to make a tube, I like to fold it in half and crochet down the edges rather than whip stitch it together.  I find it holds better and doesn't stretch.
Once you have it together its time to do the straps.

Straps:
Count 4 stitches away from the seam in both directions (8 stitches in between straps) Ss, ch2, hdc 6 stitches, ch 2. repeat for a total of 16 hdc rows.  Do not finish off if you are going to crochet the seam (see below)
Dress with ruffles and small flowers added to bodice.
No, I have no magic trick for sewing the strap to the front, You can sew it together but, again, I crochet it on.  Turn the bodice inside out, lay the two edges together and crochet across.  Again, a stronger seam than a whip stitch.  To line up where to sew it on the front, simply make sure the back seam is centered, and line up the straps evenly with the front, make sure there are 8 stitches between the two.
Now all you need to do is finish the edges (sc), You'll have to do it in three places; the outsides and armpits of the dress, and the neck and inside of the straps.  This is where you could add another color or even ruffles. Make sure you 2sc in the corners
To do ruffles:
On the outside of the strap, starting at the base: sc, 5dc, sc* repeat until you reach the other side (you're just doing a shell) 

Now its time to prepare the skirt:
I am going on from here assuming you know how to sew :)
Sew an 1 inch hem
On the opposite edge, fold and iron a 1/4 in then fold over again a 1/2 in and sew. (this is the edge that goes along the bodice)
Fold in half and sew together with a 1/2 in seam.
Iron seam edges flat

Sewing the bodice to the skirt:
Now here's where it can get tricky.  There's no real easy way to explain this so I'll do my best.

Turn the bodice and the skirt inside out.
Line up the bodice and skirt seam and pin. Now you are going to make two pleats in the front and two in the back, or if you're an over achiever you can make a bunch of little pleats all the way around...basically you're making the skirt fit the bodice... to make the pleats you fold the fabric over on itself and pin it. Line the edge of the fabric up with the top of first HDC row (so you'll have a full row under the edge)
This dress I pleated all the way around instead of two large pleats.
Once you have pinned all the way around, (I recommend pinning A LOT! You don't want that baby to move.) set your sewing machine to a zig zag stitch and sew the skirt and bodice together. Go slow, My machine did well, the crochet seem is pretty thick so I am extremely cautious here.

Whew! the hardest part is over...now to accessorize!
For this pink and white dress I crocheted ties onto it...easy enough..

Chain 70, ss along whole front just above the zig zig stitch, chain 70, ch2 turn now HDC all the way across.  Make it as thick as you want! On you last row, line up the rows of the band with the dress and crochet to the dress at the same time...or you can leave it loose...or sew it on.

The flower is a three tier flower, I found the pattern for this one here


Pocket:  Okay the pocket was my first ever and I free handed it...


If I missed something or  you have a question please feel free to ask!


This dress is an example of a simple belt and ruffle sleeve. (Ignore my horrible messy house in the background)


Another variation on the belt.  This particular dress I made the bodice shorter, more of an A-line dress. I used a wide ribbon for the tie and its crocheted in a herringbone half-double.